In the August issue of Ett trykk/Norsk Stempelblad, I made a tutorial on how to make a tea-light card.
The brain behind the original tea-light card, is actually German, but we couldn't manage to find out who,
so I started out by drawing a new template with "wings" to close the "box" :)
You're welcome to try out my template and tutorial, but I'll appreciate if you'll link back to me, if you publish a tea-light card where you've used my kind of template!
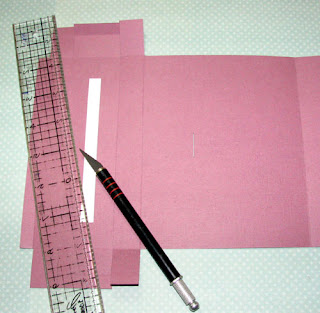
Start by cutting out the template in a piece of cardstock that messures 22 x 30 cm. Cut and score as the template shows.
Punch/cut out panels in the shapes/sizes/papers you want for your card, stamp and ink.
Glue the panels in DP to the cardstock, and remember to cut out the stripe where the candles will show.
If you want the card to be held together with ribbon, you must cut a small opening where you want the ribbon, in the line where the "tea-light box" will be glued (you can take a closer look at where I've placed the cut further down).
Panels on the one side...
...and the other.
Fasten the images/texts, and fasten the ribbon on the backside, by gluing your perconal stamp over it.
When all the pieces are glued to the card, you can glue the "box" to the card, by adding glue on the left 1cm stripe of the cardstock (on the front side of it - this pic is showing the backside of the "box").
Now you can fill the card with tea-lights, and embellish it the way you like :)
Recipe for my tea-light card:
Size: 12,5 x 16 cm
Ink: Archival Ink - Jet Black for stamping, Distress Ink - Victorian Velvet for inking the edges.
Stamps: Norsk Stempelblad AS - sentiments.
Papers: Maja Design - DP, Bazzill - antique pink cardstock, sketch paper.
Tools: Spellbinders - Nesting Mega Long & Scalloped Ovals.
Embellishments: Kort & Godt - pearls and ribbon, Storyteller - hvite flowers, Hobbyhimmelen - lilies.
I'll be very happy to hear what you think of my tutorial - have a great day!
Hugs, Lena Katrine


17 kommentarer:
Flott tutorial, og telyskortet ditt ble helt nydelig!
Ha en fin dag, Lena Katrine!♥ Klem
Denne tutorialen er så bra Lena Katrine. Har store planer om å prøve meg på et slikt kort, men har visst ikke kommet så langt.
Du som er så driftig har kanskje lyst til å bli med på utfordringene våre i den nye bloggen Kreative Krumspring . Vi har en candy gående nå også. Håper å se deg der inne.
Ha en flott dag!
Så flott telyskort, og flott tutorial. ser eskedelen er lagd på samme måte som jeg har på mine kort :) Smart med båndet rundt kortet slik det er gjort her.
klem :)
This is so beautiful Lena.
Hugs Riet.xx
Så bra oppskrift:) Resultatet var nydelig!
lækker tutorial har netop igår lavet efter manualen i Ett Trykk det er så flot.
knus pia
Your tutorial is AMAZING hun! Thanks for sharing it and love the ends on the candle box!! :) Hope you are hanging in there hun! Thinking of you every day!!!
Big Hugs~ Kim
Tack för din utförliga beskrivning.
Super sött.
Vielen Dank für die tolle Anleitung. Habe sie mir mal mitgenommen.
Liebe Grüße aus Deutschland - Maleika
Hi, Lena. Thank you for sharing such a great creation! Hugs. Miria
This is sooo great and beautifull. Thank you.
xoxo Ewelina from Iceland
Takk for den flotte oppskriften! :0)
This tealight holder looks so pretty and your tut looks so easy to follow. Thank you Lena and I sure will give it a try when I get some free time :o)
Hugs,
Cabio
Utrolig flot gave, den kan man kun blive glad for at modtage:)
Hejsan! Jag vill bara tala om att jag har gjort ett värmeljuskort efter din mall och blev "Featured Project" hos 613 Avenue Create. Jag hade jättekul när jag gjorde den och mallen var perfekt att följa. Tusen tack för att du delat med dig av den! Jag länkade även till dig.
Tusen tack igen!
Kram Mian
mianspysselhorna.blogspot.com
Cześć/Hello. My first card with candles.Thank you for the tutorial
Tusen takk for flotte maler som selv jeg skjønner <3 Så mye flott du lager :) Vennlig hilsen Lene Løvseth
Legg inn en kommentar